
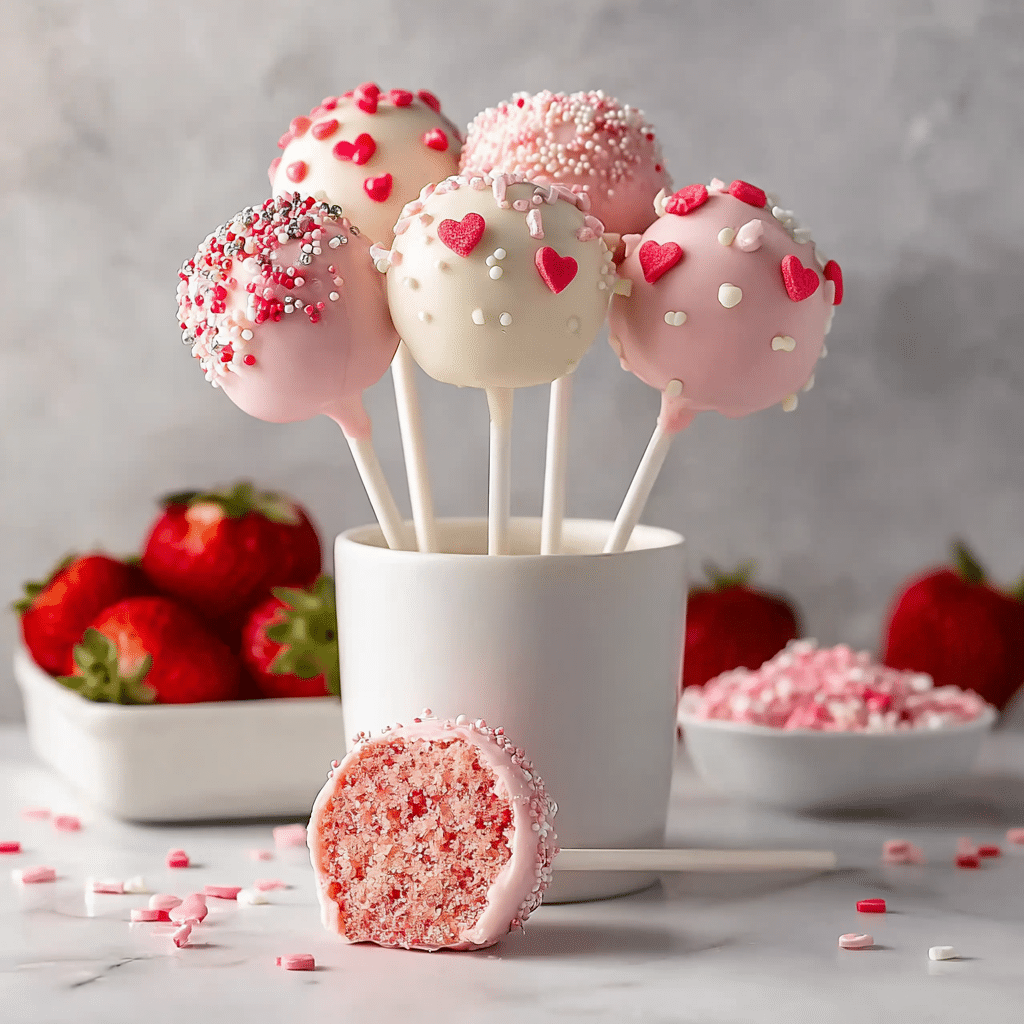
There’s something utterly magical about Strawberry Cake Pops Recipe that always takes me right back to birthday parties and festive family gatherings. I still remember the first time I made them for my niece’s Valentine’s Day party—the kids devoured them, oohing over the vibrant pink chocolate coating and the sweet strawberry aroma wafting through the kitchen. Honestly, these little treats never fail to impress, whether you’re serving them to a crowd or just indulging in a sweet bite with your afternoon tea. They’re fun, colorful, and feel like a little bite-sized celebration in every pop.
Why This Recipe Shines
- Flavor Harmony: The juicy strawberry cake blends beautifully with smooth vanilla frosting and chocolate coating for a well-rounded treat.
- Easy Assembly: Minimal baking skills needed—just mix, crumble, roll, and dip for stunning results.
- Texture Play: Moist cake inside meets crisp candy shell outside, delivering an irresistible bite.
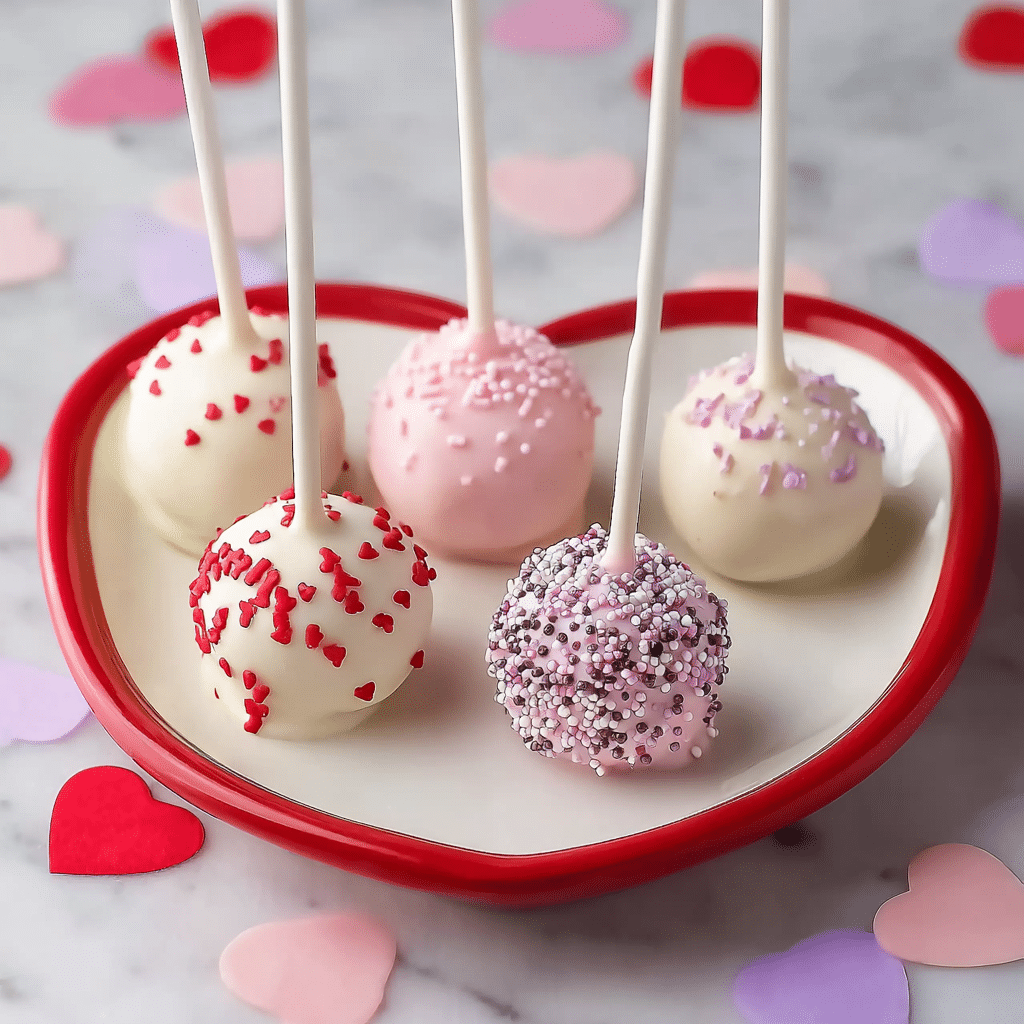
- Showstopper Finish: Festive sprinkles and vibrant colors make these pops perfect for any celebration.
What sets this Strawberry Cake Pops Recipe apart is the way these pops combine bright, fresh strawberry flavor with an addictively smooth texture that’s both soft inside and crisp outside. The colors are so vibrant you almost don’t want to bite into them—but trust me, you will! Plus, the aroma of strawberry cake baking fills your home, hinting at the sweetness to come. Whether you’re making these in February or mid-summer, they feel fresh and festive with their lovely pink tones and fun sprinkle toppers.
The best part? This Strawberry Cake Pops Recipe is approachable even if you’ve never made cake pops before. I’ll be guiding you step-by-step through everything—from baking the cake to forming perfect balls to coating and decorating. You’ll have plenty of tips to help if your mixture gets a little crumbly or if you want to mix up colors. By the time you’re done, I guarantee you’ll feel confident and proud of these cuties, ready to wow your family and friends.
Ingredients You’ll Be Working With
Measurements matter here since getting the cake mixture consistency right ensures your pops hold together well. You’ll find the exact amounts in the printable recipe card at the bottom, but here’s a quick rundown of what you’ll need and how each ingredient works its magic.
- Strawberry cake mix: The star that brings that sweet, fruity flavor and moist texture.
- Water: Helps hydrate the cake batter—use as directed on the package for best results.
- Vegetable or canola oil: Keeps the cake tender and moist; olive oil can give a different flavor.
- Eggs: Binder that also adds richness; best used at room temperature for even mixing.
- Vanilla frosting: Adds sweetness and moisture, helping the crumbled cake stick together.
- Vanilla melting chocolate or almond bark: For that smooth, hard candy coating that seals in all the yummy flavors.
- Pink or red food coloring gel: To give half your cake pops that charming rosy hue perfect for Valentine’s Day or any fun occasion.
- Valentine’s Day sprinkles: Cute finishing touch—swap out sprinkles for other seasons or parties!
If you don’t have a strawberry cake mix on hand, a basic white or yellow mix with about ¾ cup of crushed fresh or freeze-dried strawberries folded in can work beautifully here. And if you want to experiment with frosting flavors, cream cheese frosting adds a nice tang that pairs well with strawberry too.
Chef’s Note
You’ll find the complete list of ingredients with exact measurements in the printable recipe card at the bottom of this post.
Tools You’ll Need
- 9×13-inch baking pan: For baking the cake evenly, important for manageable crumbs.
- Large mixing bowl: To crumble cake and mix in frosting comfortably.
- Electric mixer or hands: Makes mixing the frosting into crumbs easy and hands-on ensures you don’t overmix.
- Baking sheet and parchment paper: Keeps your cake balls organized and prevents sticking.
- Microwave-safe bowls: For melting the chocolate smoothly without scorching.
- Cake pop sticks: Essential for dipping and serving; dipping the tips in chocolate helps them stay in place.
- Foam block or cake pop stand: Keeps the pops upright while the coating sets nice and smooth.
How to Make Strawberry Cake Pops Recipe
Let’s dive into making these adorable Strawberry Cake Pops! We’ll start by baking a moist strawberry cake, then crumble it perfectly, mix in frosting for that ideal stick-together texture, and finally get to the fun dipping and decorating. Here’s what you do step by step.
- Prepare the Cake: Preheat your oven as the cake mix directions say. Combine the strawberry cake mix, water, oil, and eggs in a large bowl. Mix until smooth but don’t overbeat. Pour into your greased or parchment-lined 9×13 pan and bake as instructed. The cake’s done when a toothpick inserted comes out clean and the top bounces back lightly when touched.
- Cool Completely: Once baked, let the cake cool fully—this is key. Warm cake will get soggy when crumbled and make the cake pop mixture too wet to work with.
- Crumble the Cake: Use a fork or your hands to break the entire cake into fine crumbs inside a large bowl. Make sure there aren’t any big chunks—uniform crumb is easier to bind.
- Mix in Frosting: Add 2 tablespoons of vanilla frosting to the crumbs. I like to use my hands here, mixing gently but thoroughly until the crumbs hold shape when pressed into a ball. If it’s still too crumbly, add frosting a teaspoon at a time until the right consistency is reached.
- Roll Cake Balls: Scoop and roll the mixture into 1-inch balls. Place them on a parchment-lined baking sheet with space between each.
- Insert Sticks: Melt a small amount of vanilla melting chocolate or almond bark. Dip the tip of each cake pop stick into the melted chocolate, then insert about halfway into a cake ball. This helps secure the stick firmly. Pop them in the fridge for about 1 hour to set up and firm the balls.
- Prepare Coatings: Melt the rest of the vanilla melting chocolate smoothly in the microwave in short bursts, stirring in between. Divide it into two bowls—leave one plain and add pink or red food coloring gel to the other, stirring until vibrant color is achieved.
- Coat the Cake Pops: Dip each chilled cake pop into your chosen melted chocolate, making sure it’s fully covered. Gently tap the stick on the bowl’s edge to remove excess chocolate. Stand the pops upright in your foam block or holder immediately.
- Decorate: Before the coating hardens, sprinkle your Valentine’s Day sprinkles (or any decorations you like) over the wet chocolate. This is the moment to get creative and festive!
- Chill to Set: Allow the cake pops to set completely at room temperature or place them in the fridge for 10–15 minutes. Keep refrigerated until ready to serve.
Kitchen Wisdom
- Tip 1: Always cool the cake completely before crumbling to avoid a soggy mess.
- Tip 2: Using your hands to mix crumbs and frosting helps you feel when the consistency is just right.
- Tip 3: Chill cake balls thoroughly before dipping so they keep their shape and don’t slide off the sticks.
- Tip 4: Work quickly with sprinkles once you dip so they stick before the chocolate sets.
How to Serve
Flavor Boosters
You can amp up your Strawberry Cake Pops Recipe by adding crushed freeze-dried strawberries into the cake batter or folding in white chocolate chips before baking. For the coating, try swirling in a little raspberry extract with your melting chocolate for a berry duo that sings. And don’t forget a sprinkle of sea salt atop the hardened coating—it is surprisingly delicious!
Perfect Pairings
These cake pops pair wonderfully with sparkling lemonade or a lightly sweetened iced tea to balance their sweetness. Around the holidays, a cup of warm chamomile or vanilla rooibos tea adds a cozy contrast. They also work beautifully as a sweet finish to a brunch buffet or alongside fresh fruit skewers for a colorful display.
Presentation Touches
For parties, I like arranging the Strawberry Cake Pops Recipe in a charming bouquet using a decorated foam base wrapped in cellophane as a gift. Also, serving them on tiered trays makes their vibrant colors pop and invites guests to enjoy this handheld dessert effortlessly. Using coordinating ribbons tied around the sticks is an easy way to add a personal touch.
Variations & Easy Swaps
- Swap vanilla frosting for cream cheese frosting for a tangy flavor contrast.
- Use dairy-free melting chocolate and vegan frosting to make these pops vegan-friendly.
- Add freeze-dried strawberry powder to the coating chocolate for extra fruit punch.
- Color the coating with different gel food colors to match other occasions, like baby showers or birthdays.
- Incorporate finely chopped nuts or coconut flakes into the crumb mixture for texture variations.
- Try dipping half the pops in white chocolate and the other half in dark chocolate for a flavor twist.
Make-Ahead, Storage & Reheating
- Make your Strawberry Cake Pops Recipe up to 3 days in advance and store them in an airtight container in the refrigerator.
- Before serving, bring them to room temperature for about 20 minutes to enjoy optimal flavor and texture.
- If coating hardens too much in storage, a quick 5–10 second microwave zap on low power can soften them slightly—just be careful not to melt the chocolate!
- For longer storage, freeze cake pops in a single layer on a baking sheet, then transfer to a freezer bag for up to 1 month. Thaw in the fridge before serving.
FAQs
- Q: Can I use homemade strawberry cake instead of mix?
A: Absolutely! Just make sure the cake isn’t too moist or oily, and cool it completely before crumbling to get the best consistency. - Q: What if my cake pop mixture is too dry?
A: Add a little more frosting, a teaspoon at a time, until it holds together well without being sticky. - Q: How do I prevent the cake pops from falling off the sticks?
A: Dip the stick tips in melted chocolate before inserting, then chill for at least an hour to firm up. - Q: Can I use candy melts instead of almond bark?
A: Yes! Candy melts are designed for dipping and set nicely, just melt gently to avoid burning. - Q: How long should the coating take to harden?
A: Usually 10–15 minutes at room temperature, but chilling in the fridge speeds it up to under 10 minutes.
Strawberry Cake Pops Recipe
These delightful Strawberry Cake Pops are a perfect treat for Valentine’s Day or any special occasion. Made from a moist strawberry cake base, mixed with creamy vanilla frosting and coated in smooth, colored vanilla melting chocolate, they are both fun to make and delicious to eat. The pops are decorated with festive sprinkles, making them visually appealing and perfect for parties or gifts.
- Prep Time: 40 minutes
- Cook Time: 30 minutes
- Total Time: 1 hour 10 minutes
- Yield: 22 cake pops
- Category: Dessert, Snack
- Method: Baking
- Cuisine: American
Ingredients
Cake Ingredients
- 1 package strawberry cake mix
- 1 cup water
- 1/2 cup vegetable oil or canola oil
- 3 large eggs
Mixing and Coating
- 2 tablespoons canned white, vanilla, or cream cheese frosting
- 20 ounces vanilla melting chocolate or almond bark
- Pink or red food coloring gel (for half of the cake pops)
- Valentine’s Day sprinkles
Instructions
- Prepare the Cake: Preheat your oven and prepare the strawberry cake mix according to package instructions by combining the cake mix, water, vegetable or canola oil, and eggs. Pour the batter into a 9×13-inch baking pan and bake as directed on the package, typically about 30 minutes.
- Cool the Cake: Remove the cake from the oven and allow it to cool completely in the pan. Cooling is important to ensure the cake can be crumbled easily without becoming soggy.
- Crumble the Cake: Using a fork, crumble the entire cooled cake into fine crumbs inside a large mixing bowl, making sure there are no large chunks.
- Add Frosting and Mix: Add 2 tablespoons of your chosen frosting to the cake crumbs. Mix thoroughly using your hands or an electric mixer until the mixture holds together and forms a dough-like consistency. Add a little more frosting if necessary to achieve proper binding.
- Form Cake Balls: Roll the cake mixture into 1-inch diameter balls and place them on a baking sheet lined with parchment paper.
- Insert Sticks: Melt a small amount of almond bark or melting chocolate in the microwave. Dip the tip of each cake pop stick into the melted chocolate, then insert it into each cake ball about halfway through to secure. Refrigerate the cake pops for 1 hour to allow them to firm up properly.
- Color the Coating: Melt the remaining almond bark or melting chocolate in the microwave. Divide it into two bowls. To one bowl, add pink or red food coloring gel and stir thoroughly until you reach the desired color shade.
- Coat the Cake Pops: Dip each cake pop into the melted colored or white chocolate to fully coat it. Scrape off any excess chocolate against the side of the bowl to avoid thick layers. Place the dipped cake pops upright in a holder or foam base to let the coating harden.
- Decorate and Chill: While the coating is still wet, quickly sprinkle Valentine’s Day sprinkles onto the cake pops. Allow the coating to fully set at room temperature or briefly in the refrigerator. Chill the cake pops until ready to serve.
Notes
- Make sure the cake is completely cooled before crumbling to avoid a soggy mixture.
- If the cake balls are too crumbly after adding frosting, add a small additional amount of frosting to help bind them.
- Use a foam block or cake pop stand to keep pops upright while coating sets.
- For different colors or flavors, try using different food coloring gels or melting chocolate varieties.
- Store cake pops in an airtight container in the refrigerator for up to 3 days.